Mount & Blade II: Bannerlord

Mount & Blade II: Bannerlord

Not enough ratings
How to make a Custom Banner for your clan
By Lite
This guide will show you a step by step process of how to create a completely custom banner for your clan in Bannerlord.
   
Award
Favorite
Favorited
Unfavorite
1. Preparations

First of all head to this website: Bannerlord Banner Editor[bannerlord.party]
It is one of the best tools in designing custom banners for M&B II. And it will be the main focus of this guide.

Also search for Banner Color Persistence mod on Steam Workshop or follow this link: https://test1.login.steam.hlxgame.cc/sharedfiles/filedetails/?id=2875642325 This mod makes it possible to transfer your banner into the game and provides some important fixes for glitches that may happen with a custom banner. However, after you use it to paste your banner in-game you may disable it as it won't be absolutely necessary anymore after that.

2. Workspace
After opening the website you should see a similar view to the picture below. If you are familiar with any designing software you will see many similarities in the website's layout. But worry not if you don't since this guide will show all it's functionalities step by step explaining how to best use them along the way, so you can jump straight into the creative process after finishing the guide.

(here is a tutorial picture with main functions labelled)


This canvas you see on the picture is your working area where you get to assemble and preview your banner. The outline in the middle of the canvas shows the frame in which your banner will be seen in-game in the Clan's tab, above your parties and settlements, etc. So keep it in mind when designing your banner.

3. Layers
On the far left of the screen is the layers tab in which you can see all your layers in order, from top to bottom. On the very top is always a banner's background layer. Underneath are the "duplicate selected layer" and "add a new layer" buttons and the layers themselves are located right below. In Bannerlord on the banner customization screen all you get to choose is the background color of your banner and one layer on top with a shape of your choice, on the website however, you can add multiple layers. Select any layer by clicking on it or move it up or down on the list by dragging and dropping it which will result in the according shape on that layer being above or below other shapes on the canvas, allowing you to create interesting custom shapes by layering simpler ones on top of each other.


Layers can also be manipulated in groups. To select multiple layers hold Shift key and select first layer of the group and last layer and now you can manipulate them including all the layers in between. You can also hold Ctrl and select multiple, specific layers you need. No matter if you select one layer or more they all can be moved up and down the list and modified using coloring options and properties.
4. Coloring and Properties
First thing on the right after layers are your coloring options and different properties. Starting from top to bottom, first you have your shapes tab where you can pick what shape you want to have on your selected layer or layers. Below it are fill options where you can pick what color you want your shape to be and underneath the fill options you can also adjust the color of your shape's outline which can be toggled on or off with a checkbox underneath the flipping options.

Coming back to the flipping options, with them you can mirror the object on X(horizontal) and Y(vertical) axis accordingly. After the outline toggle there is also a mirroring option which is very similar to the "flip horizontally" option but rather than mirroring shapes as a group it mirrors each shape separately and takes into consideration it's rotation which flips the object around it's own axis and not the global X axis as "flip horizontally" does, this removes the offset or unwanted rotation flipping it can create (It may sound confusing but if you experiment with two options, you will easily spot the difference between them).

Underneath the toggles are different object properties such as it's position, scale and rotation. X and Y values show the offset on the according axis with a canvas centre point being at (0;0) value. W and H stand for shape's width and height and the degree/rotation property shows object's rotation in degrees. All those values can be adjusted manually by writing specific numbers in the boxes next to them or in an easier but less precise way with a transformation gizmo on the canvas itself. Transformation gizmo appears on the workspace for the layer when it is selected and you can adjust all the values mentioned above with it just by dragging and rotating its points as shown on this GIF. However, for multiple layers selected you can not change the width and height separately. Those values can only be manipulated with a gizmo with Height to Width ratio locked. Also for the background layer only color options are available.


And last but not least on the very bottom of the menu are Undo and Redo arrows that can also be used by pressing Ctrl + Z for undo and Ctrl + Y for redo function.
5. Exporting/Importing the banner
To export your custom-made banner to Bannerlord head below your workspace to the banner's code and click "Copy Code" button on the left or select the string of numbers and press Ctrl+C. Then open your game and either head to your Clan's tab and click on the banner in a top left corner or just press B. You will find yourself on a banner creation screen where you simply hit Ctrl+V to paste your banner. The same can be done in the very beginning of your campaign when you are first asked to create your banner. Also you can save the banner as an image on your PC by clicking the most right button from the banner's code box on the website.

This process can be done in reverse as well. Copy your banner code on a banner creation screen in-game or from anywhere else (including this tutorial) and paste it in the same box where you have the string of code for your banner on the website with Ctrl+V and you will have your banner in the editor, ready to be modified.

6. Clan's Color pallete
Another thing to keep in mind before creating your custom banner - what color pallete do you want for your clan ? When you create your banner in-game you get to choose only the background and one shape. That background serves as a primary color and shape's fill as a secondary color for your clan. Those colors will appear on many of your clothes and armour as well as your troops' armour and horse armour.

In custom banners ,with more than one layer, primary color is still decided by the background color (or it's first colort from the top if you have a background with multiple colors on it) and secondary color is decided by your most bottom layer's fill color.

7. Main techniques in designing your banner
Once you are familiar with the basics you can start working on your masterpiece banner. So here are some techniques to help you achieve the best result.

1) Combine Shapes

to combine two or more shapes into a more complex object - set the fill color on all of the necessary shapes to the same one and disable an outline. Multiple shapes layered on top of each other all same color blend in with each other and create a more complex object. However, if you still want an outline on the object just duplicate all of the shapes your object consists of, put them below their original copies and enable the outline.


2) Subtract Shapes

Combining is great but sometimes you just need to remove some piece. In that case to subtract one shape from another - fill the shape you want to subtract with a background color of a shape underneath the one that you want to subtract from and put that shape you have just filled with background color on top. If you want an outline here too then once more duplicate all of the shapes involved and put each right below its original copy. If you have some outline sticking out use the Subtraction technique on it again to hide it.

3) Tiled pattern

Creating tiled patterns is a matter of selecting an object you want to make into a pattern, duplicating it and offsetting each copy by the same value to the right or left on X or up and down on Y axis.


4) Circular pattern

Creating circular pattern is similar to a tiled one but this time place two same or different objects on a canvas. One with any positive offset from the center that you like on X or Y axis and another one with an opposite of the first shape value on the same axis. Afterwards select both of those objects, duplicate them and using gizmo rotate them around the center as much as you like. Repeat this process until you make a full circle.


Use all of the techniques above in combination with each other and you will be able to create fairly complex designs for your custom banner.
8. Tips
Even if you precisely follow every step in this tutorial you may encounter some unexpected difficulties. So here are some additional tips for you:

1) If after an update your custom banner's layers suddenly glitch or blend with each other usually just reapplying the banner code in-game again or switching banners back and forth helps to resolve it.

2) I also prefer to keep a bottom layer hidden at all times and have a shape on it that stands out so it is easy for me to find it and change it's color, which also changes the secondary color of your clan to a different one without it being visible on the banner itself.

3) When you are working with a big amount of layers I would suggest sort of grouping them in a layer's tab by your liking. Put a layer with a shape that stands out but not visible on the canvas in between the groups you want to make so you can easily differentiate which object is made out of what layers (like if you have a sword and a shield made out of multiple layers you can separate them on the layer's tab).


Thank you for reading my guide, hope you will create the banner of your dreams. And don't forget to enjoy the process :)

Share your creations in the comments down below. I would love to see how creative Bannerlord community is.


9. Banner Codes from the Guide
Since some of the banner codes are too long - I have uploaded all of them to Google docs. So feel free to visit the following link and practice on those banners or use them as a reference : Custom Banner Codes From The Guide[docs.google.com]
14 Comments
Lite  [author] 7 May @ 1:08am 
Hey YAXŞI OĞLAN, Unfortunately at the moment there is not a perfect way to do this. For a while there has been a mod that aims to accomplish it but it is not available yet and i haven't been able to find any counterparts to it.

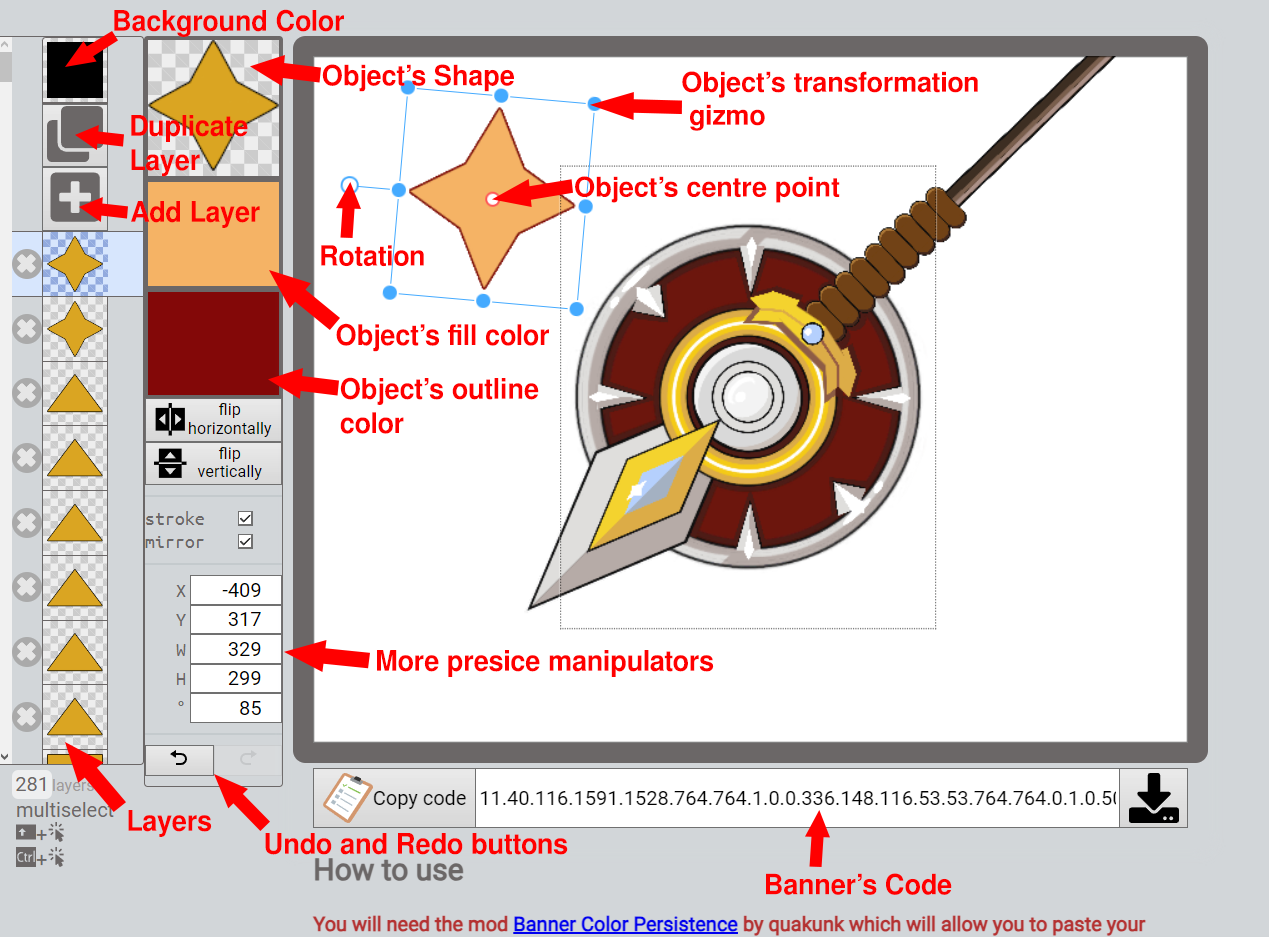
So as an alternative you can either try and recreate the image as closely as possible with a tool showcased in this guide or try and add your image as a banner decal in the game using Bannerlord Modding Kit.
İLHAM İRƏLİ 26 Apr @ 4:08am 
How do i add my own picture onto the banner?
Lite  [author] 19 May, 2024 @ 4:38am 
Hey Joker, sorry for late response but from what I have found after some research is that devs might have removed the ctrl+v option in vanilla bannerlord. Although discussions on forums about that are quite dated so I am not sure if it is still the case. However it doesn't work for me in vanilla either so I think the issue remains.

Anyways here are a few solutions I found:

1) Install this mod Enable Achievements Mod to enable back achievements no matter if you are using mods or not.
2) Use the mod to paste a banner and then delete/disable it afterwards. However with that approach some of my banners' colors got messed up after removing the mod so it is not very convenient.

Thanks for pointing the issue out. I'll keep searching further and update the guide if necessary. Also would love to hear from you if you have found a better solution.
Joknar 7 May, 2024 @ 5:06pm 
Awesome guide ! Just a few questions, you said that is not necessary a mod for the custom banner, but in my case without it ctrl+v doesnt work. The problem is If I use the mod works smoothly but achivements are disabled :steamsad: Do you know if there is a way to use a custom banner without using mods / disabling achivements ? Ty for the guide !
Lite  [author] 8 Apr, 2024 @ 10:56am 
Yes, to revert a banner you either can simply go to a save where you had a starting banner. Press B for banner editing menu and copy paste the old banner.

Or just make a banner with only one layer in banner editor and paste it. Now you ll be able to edit the shape and color in Bannerlord itself and it will be just like during original in-game banner creation.
Bigboobees 8 Apr, 2024 @ 10:46am 
is there a way to go back to the regular banners?
Lite  [author] 7 Apr, 2024 @ 2:06pm 
you re welcome )
Couteau 7 Apr, 2024 @ 12:24pm 
thanks :steamhappy:
Lite  [author] 2 Apr, 2024 @ 12:30pm 
you're welcome mate)
[kk_Leg] kRIEGER 2 Apr, 2024 @ 10:24am 
Awesome thanks mate"